Check sequence status
Use the sequence table to find missing frames, sequences still being written, and broken frames.
When you open a project, SeqLens groups the images in the folder into sequences and shows each one’s state in the Status column. When you check footage you received or a finished render, start with that column.
Reading the status

| Status | Color | Meaning |
|---|---|---|
| Healthy | Green | Every frame in the range is there |
| Updating | Blue | Some frames were written moments ago, as during a render or a copy |
| Missing | Red | Frames are missing inside the range. The badge shows how many |
| Anomalous | Yellow | A frame matches an anomaly detection rule |
When a sequence qualifies for several, the status shown follows this order: Updating, Missing, Anomalous. Rows that aren’t Healthy also get a strip along the bottom edge that colors each frame by state, so you can see roughly where a gap sits without leaving the list.
Click the Modified column header twice to sort newest first (descending), and the shots that just finished come to the top.
Finding missing frames
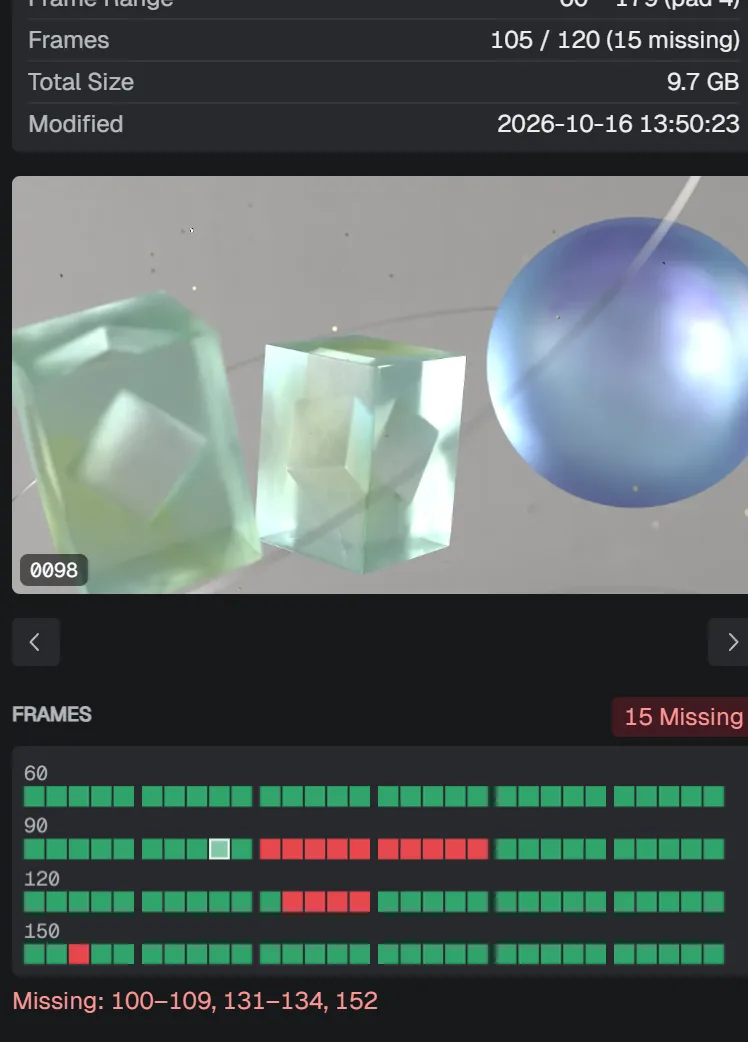
Select a Missing row and press Space to lay out its frames in the Lens.
Missing frames show as red cells, and the missing frame numbers are listed underneath (for example, 100–109, 131–134, 152).
Use those numbers as-is when you re-output the missing frames or ask for them to be sent again.
To gather every sequence with gaps, click Missing in the filter bar, or choose Select > Select Missing.
Watching sequences being written
While a project is open, SeqLens watches the folder and updates the list as frames are written. A sequence with freshly written frames shows Updating. Once writes stop for a while, it turns Healthy or Missing depending on whether the range is complete.
How long Updating stays on is set by Updating threshold (seconds) under Preferences > Scanning. The default is 5 seconds, and you can set anything from 1 to 3600. For renders and other output that take a long time per frame, a longer threshold keeps the sequence on Updating between frames.
NOTE
While a move is running, the rescan button turns to a warning color. It goes back to normal when the move finishes.
Finding broken frames
A complete range can still hide a frame that failed to write and ended up at zero bytes, or one frame that’s far smaller than the rest. Anomaly detection finds those.
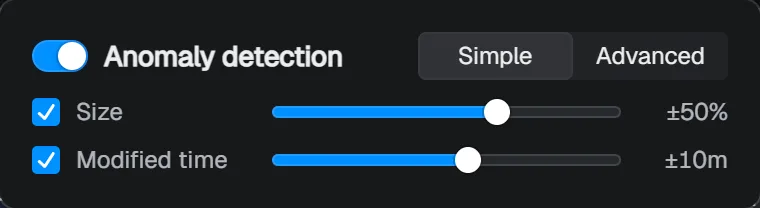
Click the slider icon on the right of the filter bar (Anomaly detection settings) to open it. In Simple mode it checks two things:
- Size: zero-byte frames, and frames whose size is far off from their neighbors
- Modified time: frames whose modified time is far from their neighbors
Move the sliders to set how much difference is allowed (±n% for size, ±n min and so on for time), and the list updates right away.
Sequences that match become Anomalous, and the matching frames are colored in the Lens frame grid too.
Right-click the frame grid and choose Select anomalous frames to select just those frames.
In Advanced mode, metadata columns you’ve added (resolution, exposure, camera settings, render time, and so on) can be part of the rules. Combine rules with AND or OR, and pick a check that fits the value type, such as Median, Not equals, or Matches regex. Anomaly detection settings are saved per project.
Graphing per-frame values
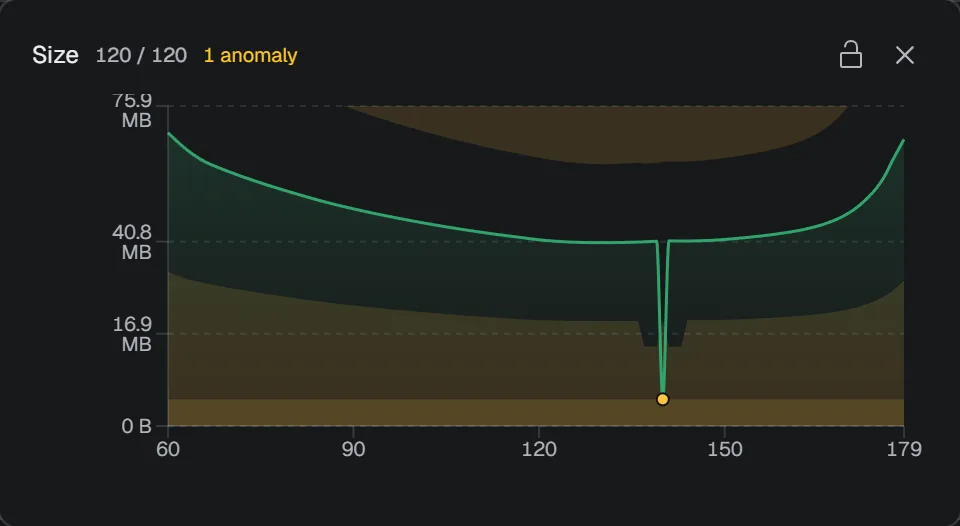
Numeric columns such as Total size have a graph icon. Click it to plot the value across the frame range as a line chart. If an anomaly rule is set on that value, the range outside the allowed band is shaded and matching frames get a dot. Hover a dot to see the frame number, the value, and why it was flagged.
Clicking another row’s icon switches the graph. Lock it with the padlock in its header to keep it open next to a second graph.
Narrowing what gets scanned
When intermediate files and cache folders end up in the list, the sequences you care about get buried. Add paths to exclude under Preferences > Scanning > Ignore patterns, written the same way as a gitignore file.
# Ignore temp files and caches
_tmp/
**/cache/

# But keep the review folder
!**/cache/review/
For exclusions that apply to one project only, put a file named .seqlensignore in the project folder, in the same format.
Which extensions are scanned is also set under Preferences > Scanning.
Supported formats and the rules for what counts as a sequence are in Troubleshooting.